"Eyes" The Secret of Eyes in Portrait Photography
-->
this time, maybe just a little Edith to make corrections, but the results will be very different and more artistic and more inside. (in my opinion)
in science photography Portrait explained that a photograph is determined by the spirit of a "Eye", because just look at the portraits with the eyes of the object, we can think and explore the soul of a photograph.
emotions will shine with a focus on the "eye"

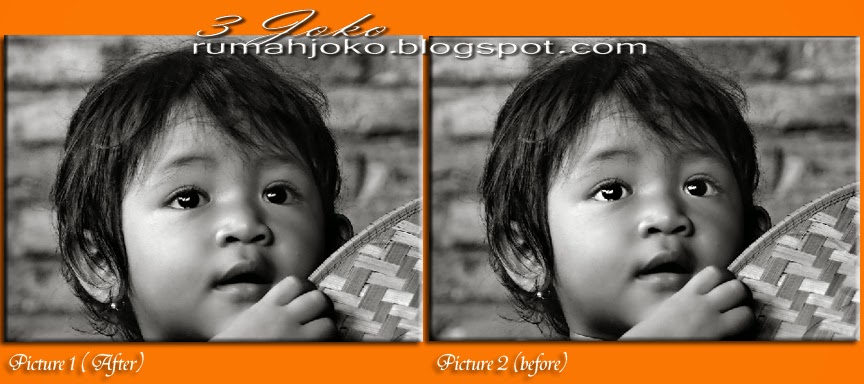
the above will explain how differences in photo 1 and photo - 2.
('Auryn' My daughter as a model)
Picture-1
if we look at the Picture-1, then we will see the whole photo. because there are no major visible image,other than from the portrait itself, all the same Black and white.but different if we look at the Picture-2.
Picture 2
The photo-2, if we look, then your eyes will be immediately drawn to the eyes of this child (my daughter as a model)Because this Photo (my daughter's eyes contrasting with the overall picture) is slightly different. looks more radiant.
Tutorial
- after seeing the concept of this photo editing, then I would be a little give way how to make my daughter's eyes to look more luminous, although this photo B & W.
- create a new layer, with the way the box below, or (Shift + Ctrln + N) and a small window box will come out as below.
- Still in the new layer, click the Brush with White color.
- Adjust the size (master diameter and Hardness of Brush according to the image file to be edited)
- brush over the eyes of the photograph (still in the new layer-layer-1)
- Set the blending mode to Overlay
- (set its opacity, lest the end result will look like the blind, because too white)
- After all stages of completion, the results will be like the picture below
*This is only one of the easiest way in my opinion, because a lot of ways to set the picture as above, for color photos are also slightly different, or if the eye color of blue or green colored object, then edit it would be slightly different way ....


No comments:
Post a Comment